Friday, December 30, 2011

...December Tag...

I hope everyone had a blessed holiday with family and friends.  Christmas is certainly a favorite and has been since I was a little girl.  My parents were always generous (with family and with charities) and have passed that wonderful generosity onto both my sister and I.  I absolutely love searching for that perfect gift, and seeing the smile when it's unwrapped on Christmas day is just the best feeling in the world.  

With the hustle and bustle finally over, I've had some time to create December's tag.  Again, not a stretch or outside my comfort zone, but I've chosen to 'be on vacation' this week in order to spend some quality time with my girls while they're home from school, so you'll have to forgive me.
I used my holiday stash before packing it away for another year.  A little sad, but I'm anxious to get back to my everyday favorites.  The felt flowers are from Making Memories and the glittery snowflake center from K&Company.  The gold leaves were ordered from Oriental Trading Company...aren't they lovely?  I also heat embossed some of the leaves on the stamped image and added glittered holly for dimension.  Simple yet perfect.
I think it fits in with the other monthly tags I've completed thus far.  I've still got to figure out what I'm going to do with the 12 tags once they're finished.  Anyone got any ideas?

I'm going to close for now, but I'll be posting photos of some simple clothes pin magnets sometime next week.  They make great gifts!  In fact, each of my girls' teachers got a set for Christmas.

Have a wonderful Friday and a relaxing weekend.
M.

Tuesday, December 6, 2011

...News to share...

I have some exciting news!  Exciting for me anyway...
I've been published!!
Creating Vintage Charm magazine featured my Burlap Holiday Treat bags in their Winter issue. 
 What an honor to find myself among such talent!  I absolutely love burlap and the other featured Etsian artists have found unique ways to use it...everything from table runners to stockings.

This publication is filled with beautiful photographs, tutorials, recipes and "Meet The Artist" articles.  Worth every penny!  Check out Creating Vintage Charm for yourself!

Thanks for sharing in the news with me!


Wednesday, November 30, 2011

...November's Tag and a little stocking...

I hope everyone had a happy Thanksgiving.  I certainly did.  I treasure every minute we get to spend together, and do everything I can to create long lasting memories for my three girls because family is so important to me.  I have many fond memories of our very large family gathered around the dining room table that had been added onto to accommodate everyone and it extended into the living room at my Grandparent's home.  We also had the infamous kids table set up in the kitchen!

Now, we're preparing for Christmas, and I've been so busy trying to keep up with shop orders that I've neglected my blog responsibilities and am now just getting around to posting November's tag.
Materials used:  standard shipping tag, ART copper glitter mist, Tsukineko Walnut ink,  real leaf, Prima paper (Botanicals), Tim Holtz distressing ink in Tea Dye, gold glitter glue, stamped image, miscellaneous glittered leaves, vintage printed image, fiber trim, petite pine cones, vintage button, grosgrain ribbon and beads.

Nothing too fancy or out of my comfort zone since I haven't had much time as of late, but I love all the fiber trim and the vintage image.  The stamp is a new one from EK Success that I purchased on Etsy.  At this time of year, I always try to 'pay it forward' so-to-speak by making purchases from other shops.

Getting back to holiday preparations, I've just recently created these cute little burlap stocking ornaments and listed them for sale in my shop:

I used the old coffee sacks that I purchase a couple of years ago at a steal.
I've stuffed them with tissue paper to hold their shape on the tree, but they can also be filled with small candy canes and attached to a gift.  
Materials used:  vintage coffee sack burlap, vintage doilies, plaid ribbon, glittered berries, petite pine cones, gaffer tape, 26g black wire, gold mesh leaves and glittered chipboard snowflakes. 

What I absolutely love about these is that they've been created using scraps...not to mention how cute they are!

Well, I should get back to the studio to finish up on this week's orders, but I hope you all have a wonderful day.  I appreciate you stopping by!

Monday, November 14, 2011

...Vintage Holiday Decorating...

I love nothing more than an old time vintage feel when it comes to holiday decorating.  I especially love the ornaments handmade from old pieces of muslin or your grandmother's stained doilies....even vintage sheet music and book pages make a wonderful medium.  A beautiful way to re-purpose those cherished items (usually sitting in a draw or in the attic) so they can be enjoyed year after year.

With Thanksgiving right around the corner, I've started creating for the holidays.  Honestly, crafting unique holiday items is one of my favorite things to do, and since I'm not participating in any craft fairs this year, I have plenty of items for sale in my Etsy shop.  

Crafted from vintage sheet music, silver buttons and mica flakes, these medallion ornaments are simple and stunning.  
Postcard images can be framed and embellished for a vintage feel. 
Clothes pin angels...
I created angels from vintage clothes pins, lace and my grandmother's old doilies.  I added tulle underneath for a fuller look.
I also added some ribbon, a floral pin and buttons. The wings were hand cut out of card stock and Prima paper then glittered, and the wire was attached behind the wings for hanging.  My daughter says it looks like a halo. :)


I also love to create gift tags and treat bags.  Even something as simple as a handmade gift tag adds charm to any gift.
These ticket tags are much more simple in style but still add that unique handmade charm...
And who doesn't like to get goodies for the holidays?  I created these treat bags out of old burlap coffee sacks and thought they would make a perfect presentation of those handmade cookies.  I can't take credit for the design though...this is just my take on it.  The original design is by Melissa Phillips.

I've created vintage paper wreaths and garland, mitten banners and tussies out of vintage items, and they can all be found at Reverie Creations.  Stop by, I'm sure you'll find something for your holiday decorating,  and if you leave a comment here and mention this blog post upon checkout, then you'll get 10% off your order (minus shipping costs).

Have a wonderful week, my friends!
Happy crafting!!


Thursday, November 3, 2011

...Halloween and happiness...

There goes October and we're already looking at 6 inches of snow on the ground just 3 days into November.  I'm still trying to wrap my head around the fact that the girls and I went trick-or-treating in snow.  I can honestly say that although it's been cold on Halloween we've NEVER had to deal with the white stuff before.

Such is life. 

We still had a great time, though my oldest refused to wear her original costume because of all the layering underneath.  She said it was too tight...aaahhh...tweens!  She went as herself.
Here is Kenzie as a beautiful bride.
Madison as a not-so-scary witch.  She always has a smile on her face no matter what is thrown at her...like a fleece and two pair of socks. ;)
My nephew, Kolby, as a ninja.  It fits his personality perfectly.
Kade as a "Katie".  He made me laugh so much!
We were cold and tired by the end of the night, but we came home with bags full of treats and a lot of wonderful memories.  Happiness is what you make of the situation you find yourself in.

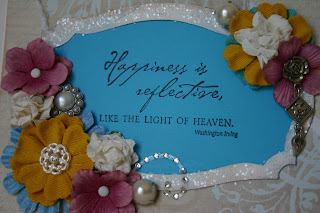
In the spirit of happiness, I created a card based on Washington Irving's quote...
"Happiness is reflective, like the light of heaven."
Materials used:  card stock, handcut frame, Tim Holtz Distress Cracke paint in Picket Fence, K&Company Curio paper, Webster's Pages Ladies & Gents paper, Tim Holtz Distress ink in Tattered Rose, glitter, Cloud 9 Design clear Laughter stamp, Decorator's Choice petite roses, OTC canvas blossoms, Heidi Grace blossoms, vintage button, Jolee's pearl bling, K&Company The Kiss brads, rose dangle snap charm, and Colorbok adhesive gem flourishes.
The colors were inspired by Moxie Fab World's Tuesday Trigger:

Absolutely love this bracelet...the colors and textures make me want to own it!

I hope you too had a wonderful Halloween.  I'll be posting November's tag sometime over the next few days, so please stop back.
Thanks for spending some time with me.


Tuesday, November 1, 2011

...Newsprint destiny...

Progression is a natural occurrence in every aspect of our lives.  From how we communicate to how we live to the way we age.  We don't have to like everything about it, but we do have to bend and sway with the changes or we'll wind up like the infamous cat lady...living out of touch with reality and depending on the obsolete for our day-to day decisions.

Take for example, newsprint.  It used to be that young boys would run up and down the streets screaming the headlines to peddle the daily newspaper, then progression took over and today newsprint is practically non-existence.  With downloads and online news blogs, you can educate yourself with what's going on in your backyard and across the world just by turning on your phone. 

Honestly, I'm sad.  I love newsprint...any type of paper, really.  Book stores are closing at every turn and magazine subscriptions are becoming so expensive that those with less of a disposable income (because of the economy) are opting to sacrifice the tradition of the Sunday morning 'read'.  I admit I've canceled my tangible news and interest/hobby articles for the on-line versions...the expense is far easier to manage, and the impact to my coffee table is less intrusive.

With that said, there are those of us who mourn the dwindling supply of newsprint (paper in general), and are trying with a sense of urgency to pay homage and preserve it by utilizing/recycling it in every imaginable way...

 from home and holiday decor...

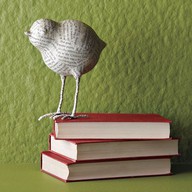
Paper mache bird

Newsprint holiday trees
Newsprint decoupaged pumpkins
to gift wrapping...

Newsprint goodie bags

Newsprint wrapping paper with stamped tags
to crafting...
Newsprint used as a transfer

Newsprint roses

to canvas' for any form of medium...

Newsprint used as a canvas
Newsprint prints
to attire...

Newsprint dress

Newsprint purse

I could go on and on with examples of how versatile newsprint is to the crafting/artistic world, but the point is mute because progression has taken hold and isn't letting go.  The day is fast approaching when we will be virtually paperless, and I don't know about you, but I don't like it.  

Recycle that precious newsprint into something to cherish.  It might be worth money some day. :)

**Please note:  all photos are from Pinterest**

Wednesday, October 19, 2011

...School Picture Keepsake Album...

The girls have been back to school less than two months and already they've had their school pictures taken.  Our school system has some sort of deal worked out with the photographer because they return in the spring for another session of school pictures...obviously to take advantage of those parents with way more disposable income than the average Joe Schmo (like me).  With that said, we get two opportunities to amass a collection of wallet size photos, and I don't know about you, but no matter what package you purchase you're always left with more 'wallets' than you can get rid of.  Don't get me wrong, I love the idea of the school picture.  It's nice to look back on them (and wonder what you were thinking), but let's be honest, they're usually scattered about here, there and everywhere.

So, I decided to create a little keepsake album for each of my girls where all their wallet size school pictures can live...orderly and in one place, and I used something you can find in your local office supply store...coin envelopes and shipping tags.

Unfortunately, the coin envelopes I happened to have on hand were too small, so I created a template by opening one up and tracing it just a bit bigger onto regular card stock.

It adds a little extra work having to make your own envelopes, but you can also create them using your favorite papers. 
Once you've traced and cut, you can glue them together...leaving the top open.

The first thing you want to do when preparing to assemble is to fold the top flap back (as shown in the top two envelopes. 
Then you're going to apply glue to the top flap of one and place it on the open side of another so that you're in essence sealing it closed (the following photos show the process).
The last envelope will be your cover so keep that in mind during assembly.
Now it's time to add the slits that will become the pockets for your shipping tags.  The tags are for any journaling you want to add for each photo such as date, grade, or teacher name.
I chose to place them on the sides of each page...towards the bottom.
In my original album (photo below), I cut the slits at the bottom of each page, and although I thought it was cute, it wasn't easy to stand up.  Where you want to place your tags is completely up to you.
I used standard shipping tags for my album, but it really doesn't matter what size you use as long as you cut a slit large enough to hold your chosen tag.

Now the fun begins...embellishing!
I embellished just along the edges of each page so that I had room for the photos.
I stamped each tag and added a bit of ribbon on the ends, but you could add any sort of embellishment you want.
The entire album measures approximately 3.25"x3.75" and holds a wallet size school photo perfectly.

A cute little keepsake album that organizes all those wallet size school pictures...and it utilizes standard office supplies.  What's not to love?

I'd love to see your take on this project.
Thanks for stopping by, and I hope I've inspired you to create!